
A pressure washer is a small tool that can help you accomplish big jobs! Usually, a pressure washer is meant for cleaning strong dirt and dust with ease. The pressure washer can do different level tasks like cleaning flat surfaces, car, washing garage, driveways, concrete or tile patios and the number goes on. To get the optimum performance out of this machine, you need to adjust the unloader valve on the pressure washer.
Well, the job of adjusting the unloader valve is not a daunting one. You can do it on your own! To do that safely and like a pro, you need to learn how to adjust the unloader valve on the pressure washer.
Basics Of Pressure Washer
Before you jump onto the steps of adjusting the unloader valve, you should learn some basics of a pressure washer. Most of the pressure washers have a number of common components and features. Among them, the most common and important components are the nozzle, unloader valve, pressure gun, pressure hose, and hose reel.
All of these components contribute to your cleaning jobs. Like many machines, a pressure washer is driven by its motor. The motor produces the ultimate power that ensures you get the appropriate flow of water.
Why do you need to adjust the unloader valve?
Depending on your nature of cleaning you might need different levels of pressure that a big or a smaller pressure washer can offer. Among all of the components of a pressure washer, the unloader valve is responsible for regulating this pressure. So, despite being a small part of a pressure washer the unloader valve plays an important role here.
To save the electricity or fuel consumption of your pressure washer, you need to use it in an appropriate manner. Furthermore, when you handle the pressure of your pressure washer properly, your washer lifespan increases! Every task is not worthy of investing in equal pressure. Even if you have the best 3000 PSI pressure washer, you should regulate the unloader valve considering your cleaning jobs.
For example, if you apply too much pressure on your car washing, looking mirrors or other vulnerable parts may break down. On the contrary, when you apply insufficient pressure to clean sturdy dirt/dust on your driveways like places, your job is never gonna finished!
Uncontrolled high pressure creates a sudden pressure spike that may damage the objects you love. So, to clean the objects in a professional way and to keep the process simple, you need to adjust the unloader valve on your pressure washer.
How does an Unloader Valve Work?
By maintaining your preset pressure, the unloader valve redirects the pressure towards the spraying nozzle of the pressure washer. When your pressure washer has its pressure gun depressed, the unloader valve ensures the flow of water towards the nozzle.
On the other hand, when you release the trigger, the unloader valve redirects the flow of water towards the inlet valve. This ensures the safe circulation of water inside the pressure washer pump. So, it is evident that the unloader valve regulates the water flow the way you need it. But, to make that happens in your desired way, you need to adjust the unloader valve first.
Things to Do Before You Start Adjusting the Unloader Valve:
The adjustment of the unloader valve is a pretty simple task. You may have been using a particular pressure washer, but the process is quite the same for most of the machines. Before you start adjusting the unloader valve, you should perform the followings preparatory tasks:
- During your adjustment task, the pressure washer motor should be running. To set the motor at proper rpm, maintain 3700 rpm before a load and 3400 rpm under the load.
- Take off the nylon lock nuts from the unloader valve. Now, shut off the pressure adjusting knob and spin it to remove from its bay.
- Now, remove the washer and spring from the unloader valve. Once you removed them from the valve, you will see a threaded piston having two locknuts.
- At this phase, you need to use a wrench to lock these two nuts. Apply only 3 threads off the bottom and then put back the washer, spring, and locknuts to their previous positions.
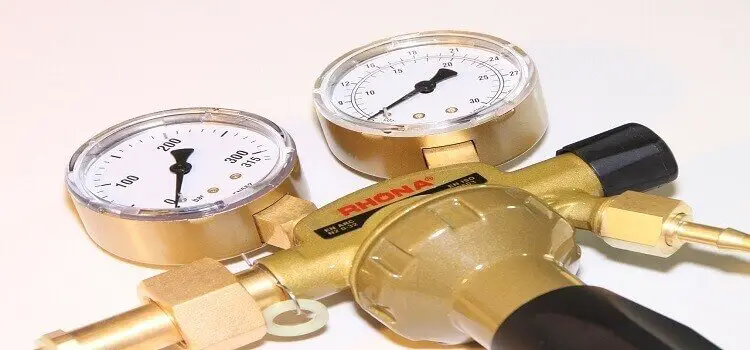
- Now, clip a pressure gauge assembly between the pressure hose and the pump. Make sure your clipping allows you to see the pressure hose and pump during the unloader valve adjustment. This will ensure perfect adjusting while you trigger the gun or tighten the knob of the unloader valve.
Curious about the best 3000 PSI pressure washer for the money? Well, you should analyze before you buy one. Click here to read the complete buying guide.
Steps of Adjusting the Unloader Valve
To keep the procedure of adjusting the unloader valve on your pressure washer simple and easygoing, we have made five easy steps. Read them carefully to learn the proper procedure so that you don’t face any difficulty during the fixation.
Step One
Turn On the outlet valve of your pressure washer. This will let the water flow. Then, the water will push the air that remains inside the nozzle. Do not turn off the outlet valve until all the air gets out and only water flows out the hose.
Step Two
Keep an eye on the pressure gauge assembly and start tightening the pressure spring. Engage the gun trigger and watch out for the point when you reach the maximum pressure. When you disengage the trigger, the pressure spike should be around 6 to 9 percent.
Step Three
If you are unable to make the pressure spike less than 10 percent, you need to keep moving the nuts until you get the sweet spot. Anything below ten percent spike would be the acceptable range. If you are still unable to do that by adjusting the lock nuts, you have to unlock the nuts, washer, and spring again.
Step Four
Once you are done with finding the sweet spot, let the trigger gun go off for a minimum of 15 to 20 times. This will make a perfect break in the unloader valve and ensure that the valve doesn’t get hung up. Observe carefully here; if you want to set the pressure at 3500 PSI, then when you let the trigger go off, it should not exceed 3850 PSI.
Step Five
Now, if you achieve your targeted adjustment, place the lock nuts, washer, and the pressure spring to their respective places. To finalize, check the readings on the pressure gauge once more to see whether it is giving the same readings. Once finished, screw the lock nut back on top of the piston rod. Do not forget to put back the cap of the adjusting knob to its place.
Hunter Tips
Don’t crank down more on the pressure spring. By doing so, you won’t get any more working pressure with the trigger engaged. On the contrary, when you let go off the pressure gun you will get a high-pressure spike that may damage your pressure washer completely!
Conclusion
When your power machine works the way it should, the world is much easier for you. To get optimum results, try to find and use the best pressure washer for the money you can afford. Don’t be so careless or lazy to adjust the unloader valve on your pressure washer. Regulating the unloader valve on your pressure washer can provide the exact result you are looking for. We hope that our article on “how to adjust unloader valve on pressure washer” was helpful for you.
That is really interesting, You are an excessively skilled blogger. I have joined your feed and look forward to in quest of extra of your fantastic post. Additionally, I have shared your site in my social networks!
Thanks Leif. You’re always welcome here to read our blog posts. Glad to know that you shared our post. Thumbs up!
I replaced my pressure regulator last year that said it was preset for 3000 psi. It worked fine for a couple months with no adjustments. I went to use it last weekend and it worked for about 5 minutes. Now when I pull the trigger it shuts off. This was the reason I replaced the valve in the 1st place. What should I look for? Could it be a blockage in the hose? It’s old and partially kinked in one area. I don’t need a perfect pressure washer, just to power wash driveway and deck, dirt bike, etc. Your help would be greatly appreciated. Thanks.
Hi Scott,
There may have several reasons that shutting off your power washer. We have a complete & thorough troubleshooting article on this particular problem. We encourage you to read the article here https://www.powertoolhunter.com/pressure-washer-shuts-off-when-trigger-released/. Thanks…
WOW! You must be easily entertained. He told us NOTHING. The manual tells you to adjust the unloader per the job your doing. You say not too except to set at maximum pressure. NOW WHAT? The nozzle lets out pressure thus a lower pressure. What is I want THAT nozzle pattern BUT less pressure. Do I adjust the unloader? Do I idle down the engine? WHAT? NO one EVER answers this. Thank you.
Also, does the unloader sit there and vibrate off pressure when you turn it down from the maximum (in my case 4000psi) ? Is that what is bad for it. Then why does the manual say to turn it down for different jobs. There is actually a + sign and a – sign on the knob!!?? It doesn’t just say ‘change the nozzle’. I called SIMPSON and the gal knew NOTHING. Just a parts runner.
I think I spoke to the same girl. She put me on hold for 5 minutes, and when she came back she didn’t even understand the question. She couldn’t even process what I was saying, just “it comes preset from the manufacturer”. Anyway, pull the black cap off the unloader using the black c-clip, and you’ll see the 2 nuts. Mine had to be backed out a little, then set the black nob back to max setting, because you never want to go over max, right? A better way to control pressure is with larger orifice tips or if you’re cheap like me, just lower the engine speed.
Thanks Hassan for your nice suggestion…
What happening if my detergent hose is squirting water of it?
It may happen due to high water pressure, foreign material in the hose or blocked hose tub. Check these portions to figure out.
I’ve been fighting low pressure. I cleaned nozzles, installed new unloader valve, set throttle on engine, changed hose and wand. When I pull the trigger, I get a high pressure blast then instantly goes to low pressure. Any ideas?
Hi Butch,
Sad to know that you have tried so many things still your problem persists! Typically, pressure nozzle is the responsible part that lets the pressure to weaken with time but not suddenly which is yours case. As you cleaned the nozzle,I assume it is now free from debris or any possible clogging. Just one last effort could be changing the nozzle. A worn out or deviated nozzle causes to loss pressure all on a sudden. Hopefully, changing the nozzle will solve your problem.